Thursday, December 19, 2013

Emmeline Apron in Impressions

 
Emmeline Apron by sewliberated in Impressions Event Abbey & Solara prints by Ty Pennington with Kona Nightfall.
 
It was sort of a gloomy, cloudy afternoon when I tried to get some shots of the apron before picking S* up from school (early release for exam day).  Not very good at taking pics of myself either.
This is a Christmas gift for a friend, hope she likes it.  I think the fabric is much prettier than these photos show.
 
This time I did not use interfacing for the very top accent piece on the apron.  I think I like it better less stiff.  I also did not make the neck tie strips on the bias, I was feeling lazy/crunched for time, but they seem to be fine to me.


Monday, November 11, 2013

FHE: Honesty

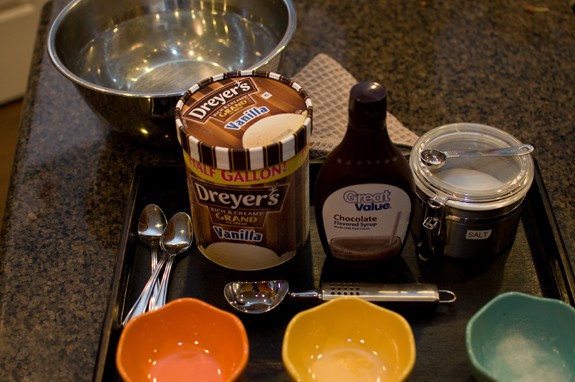
Tonight we are going to use this object lesson involving salt & ice cream from Over the Big Moon for a family home evening on honesty.
 
 Like was suggested in a comment, I microwaved the bowl with moistened salt to thoroughly encrust it onto the bowl.  It took less than a minute for mine.
 
DSC 0681 An Object Lesson for kids on Honesty
 
{picture from Over the Big Moon}


Wednesday, October 30, 2013

Dorothy & Tin Man

This year K* is Dorothy and S* is the Tin Man.
 
Dorothy
 
 
Pattern: McCall's 6313
(size 7, I lined the skirt and the buttons are just for looks)
Fabric from JoAnn's
Ruby slippers ($11) & Toto in basket ($7) from Gymboree
Socks from Target
It was easier to just wear a white t-shirt than make one.
 
For Halloween, we'll do low pony tails with bows.  It's been raining all day, so K* and I ran outside on the porch really quick to try and get a shot or two this afternoon.
Hopefully I'll get a picture of them together tomorrow.


Tin Man
 
The Tin Man has been very busy in the evenings this week and was available for a few quick poses right before bed tonight, which was later than it should have been (again).
 
Spray painted a funnel from Walmart ($1) silver.
Long sleeve tee from Walmart too.
Gray flannel and red felt from JoAnn's.
He'll probably just wear jeans with it for Halloween.


Saturday, October 26, 2013

White Eyelet Baptism Dress: New Look 6043

 
For K*'s baptism I made the dress she was baptized in.  Now she wears it as a nightgown.  I think it turned out really sweet.


White eyelet from Hobby Lobby.
New Look 6043.
I lengthened it down to her ankles, it's fully lined and, like I did in her diamond eyes top, I made a size 6 with a size 4 neckline and an elastic loop & button back closure {from craftinessisnotoptional}.


White Doll Dress

My mom made this dress for K*'s American girl doll to match her new white baptism dress.


I think she did a great job making it match K*'s actual dress.
 

Thursday, October 24, 2013

Lemonade Stand

 
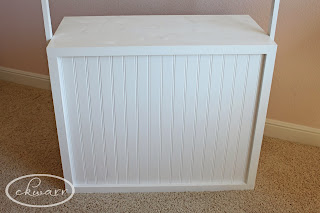
For K*'s 8th birthday, I talked my father-in-law into helping me build a lemonade stand using Ana White's plans lemonade stand for Grace's town collection.
 
It took about 2 hours and 45 minutes from start to clean up to build.
I mainly stood there trying to look useful while my father-in-law did all the work; but it was fun to be a little bit helpful at times.  He built it just how I was picturing it, I'm so happy with how it turned out!


I had him modify the plans a little as you can see from the photos.  A 1x16 was used for the top and sides to give it a little more depth.  We cut the sides at 29" tall so that it is just under 30" high and can be used with a regular chair.  The shelves are 1x6's since we made it a little deeper.  The banner posts are 1x2's that are 6' tall.
It seemed to take a lot of time to fill in holes, sand, prime and paint over a couple of days as I had time at night or while K* was at school.  Maybe it was the drying time, it was so humid out.


I plan to make several banners, both paper and fabric, for various stands.
Ice Cream Shoppe, Bake Shoppe, Flower Shoppe, Café, Paper Creations....
 
All the banner supplies are from Hobby Lobby.  The font for lemonade is Frosty.  The letters are about 3" tall.  The pennants are about 6 1/4" not counting the tabs.  I cut it all out on my silhouette.
 

Tuesday, September 17, 2013

Painting

We moved into our house in August, so I haven't been up to many crafty projects.  I have been painting ceilings and walls along with unpacking, cleaning, and organizing (or at least I've been trying to do those things most days).  I started out by painting the ceilings white in the laundry room and two bedrooms.  Not my favorite painting task I must say, in fact I may never paint another ceiling or it will be a really long time before I do again. 

 
Homestead Resort Antique Lace
 
The laundry room is a light, happy, creamy, sunny yellow.  I think it looks nice against the blue of my washer & dryer and the cabinets.  It was hard to get an accurate picture of the color it really is, but this is as close as I could get.  I used a Lowe's Valspar color but in Behr paint & primer (flat), I barely had enough with a gallon.  I actually painted the laundry room ceiling and started on the walls the day after we closed.  I ended up only painting the walls where the washer and dryer would be before moving in as I had a limited amount of time to do a million things.


For my son's room we went with light blue walls and a darker blue wall with a red stripe.  My son helped with picking out the colors, we both thought the light blue would be grayer than it is, but oh well, he likes it.  I knew tape wouldn't keep the red from bleeding onto the blue, so I used a level and pencil to draw the lines for the stripe and painted it with a paint brush (two coats).  The light blue was Lowe's Valspar signature paint & primer in flat and the blue and red were Lowe's Valspar ultra paint & primer also in flat.  The ultra is a bit less $$ and I think I like it just fine compared to the signature.  The red is a little less red than it appears in this photo.
 
Light Blue: Ghost ship
Blue: Lost Atlantis
Red: Pedicure at Lunch
(I didn't tell him the name of the red paint, I didn't want to pick out colors based on the name 'cause ghost ship and lost Atlantis sound pretty awesome to a twelve year old)
 
 
For my daughter's room, I made it easy on myself to pick colors and just went with the four that were in the Sherwin-Williams Enchant color collection.  They also happen to match her comforter and other things we already have quite nicely.  I ran out of light pink paint and had to buy another gallon of it and a quart didn't quite make it for the darker pink, so another quart of it too.  Grrr. I still need to add some molding between each stripe, but this is what it looks like so far.  I used Lowe's ultra paint & primer for all the colors.  Again, I tried to get a photo that came close to showing the true colors, but this is off just a little bit.
 
Light Pink: White Dogwood
Dark Pink: Lotus Flower
Blue: Frostwork
Green: Shagreen
 

So far, I've been good about painting a paint stir stick with each color in our house so that if I need a sample to take to the store to match something to I easily can.
 
Kwal colors painted by the builder include:
All over: Crisp Khaki
Dining Room: The Loft (green)
Trim: Pure Snow
 
Group 1: Homestead Resort Antique Lace, The Loft, Crisp Khaki
Group 2: Pedicure at Lunch, Lost Atlantis, Ghost Ship
Group 3: Pure Snow, White Dogwood, Frostwork, Shagreen, Lotus Flower
 

Sunday, July 7, 2013

Watercolor Over White Crayon


We used watercolor paper, white crayons, and watercolors for this afternoon project.
 
Idea here.

Salt Painting


Construction paper, Elmer's glue, salt & watercolors
Ideas: here and here


Tuesday, June 25, 2013

Sedona & Prairie Cream Chop

 
 St. Thomas Country Manor
Brick: Acme Sedona with white mortar
Stone: Prairie Cream Chop with white mortar
Paint Colors: Fossil Stone {trim} & Dusty Trail {body}
Stain on Louvres & Columns: English Chestnut
Door Style: Harvard Mahogany in English Chestnut Stain
 
When making selections for the exterior of the house, I appreciated the few pictures online that others posted giving me a basic idea of what something might look like, so I thought I'd do the same.  We spent hours driving around looking at addresses with brick and stone we were considering.
 
We are very happy with how all the exterior elements look together.
 
We did wonder about staining the columns and louvres or leaving them natural.  We decided to have them stained and really like them stained.
We also wondered about the garage doors being the "darker" exterior paint color.  At first they were painted fossil stone, and we liked it.  But we had planned on them being dusty trail, so we had another choice to make.   I think they'd look nice either color, in the end we had them painted dusty trail.


And we do not recommend working with TBI Mortgage, they have caused a nightmare for us.

Wednesday, June 19, 2013

Happy Weekender Quilt in Happy Tones

 
The Happy Weekender quilt pattern from Moda Bake Shop in Happy Tones by Michael Miller Fabrics.
Front: Happy Tones charm packs.
Backing: Happy Tones Spotlight.
Binding: Happy Tones Aqua Cora print.
Gray fabric form Jo Ann's.  I bought 1 3/4 yards after reading in the comments that some people who made the happy weekender didn't have enough with the 1 1/2 yards in the instructions.  I made the strips as I went along and wish I would have bought 2 yards, but am glad I at least had 1 3/4 yards.  It all worked out in the end by piecing some pieces together.
 
I made this quilt for my SS who graduated from high school this year. I am so happy with how it turned out; love the fun, bright colors and it was a nice chance to try gray instead of white for the solid. I kind of wanted to keep it for myself.


My two little munchkins held it up for pictures for me; gotta put them to work while school's out.
 
I attached a label for the first time ever to a quilt.  I hope the micron pigma pen works out. I like the idea of having it in the corner.  I searched on line for ideas on quilt labels and this was my favorite look.  I did heat set it with the iron and washed it two days after writing the label.

 
I also did some "real" free-motion quilting for the first time on this quilt.  Previously, I have just sewn straight lines {or a zig zag stitch in straight lines} on my quilts & table runners.  I have a sweet friend who offered to let me use her quilting machine and frame to do it.  I am happy with how the loopy loops turned out.  I may try it again later this year, it was kind of fun.